Robotic arm controlled with Arduino Circuit Diagram Effortless control: Explore Robotic Arm Control using PIC Microcontroller to enhance precision and automation in Arduino projects.

This STM32 Nucleo expansion board has a switching regulator to provide up to 3 A to 6 servo motors. It also translates a 3.3 V PWM signal from the microcontroller to 5 V for each of the servo motors, and has a power enable signal. A unique feature is its Wii Nunchuck connector. This makes it ideal for controlling a robotic arm, such as the EEZYbotARM MK2, using a reverse-engineered I2C
IoT Robotic Arm using NodeMCU and Arduino IDE Circuit Diagram
This paper focuses on model design, simulation and control of a five degree of freedom (DoF) robotic arm using servo motors. The robotic arm is controlled by a PIC 16F877A microcontroller and its main function is to generate pulse width modulation (PWM) signals which are applied to the servo motors for achieving the desired rotation angle.

Complete guide on humanoid robotic arm implementation and circuit diagram. How to use pic microcontroller in arm based robotic control Assuming that you have somehow got hold of your robotic Arm lets proceed into the project. Circuit Diagram The Complete circuit diagram for this PIC Microcontroller based Robotic Arm is shown below. The schematics was drawn using EasyEDA. The circuit diagram is pretty simple; the complete project is powered by the 12V adapter.
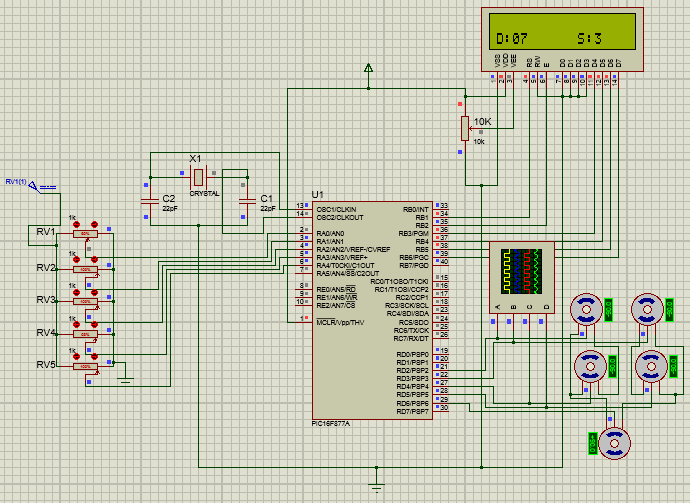
PIC Microcontroller Based Robotic Arm Circuit Diagram
The project, Robotic arm is controlled by a mobile application known as BLYNK. It is free and easy to use for automation and IoT projects. In this project, multiple servo control different axes and rotation of the arm in a different directions. Components Required for IoT Robotic Arm NodeMCU Servo Motors Male-Female Headers Jumper Wires
